
|
Overview Import lets you bring data from outside Montro into the platform using CSV files. Rather than adding applications, users, contracts, or payments one by one, you can upload them in bulk using Montro’s templates. Every import is logged so you can track what was uploaded, by whom, and whether it succeeded. |
Why Imports Matter
Most organisations start Montro with data that already exists somewhere else - spreadsheets, existing systems, or records from previous tools. Manually re-entering all of that is time-consuming and error-prone. Import lets you bring that data in quickly and accurately, so you can focus on governance rather than data entry.
Common situations where Import is useful:
| Situation | What to import |
| Setting up Montro for the first time | Users, Applications, Contracts, and Subscriptions to establish your baseline inventory |
| Migrating from another tool | Export from your old system and import directly into Montro |
| Adding bulk payment records | Upload payment history rather than entering transactions individually |
| Onboarding a new team or department | Import their users and applications in one go |
| Updating contract or subscription records | Bulk update renewal dates, values, or terms across multiple vendors |
Accessing Import
To get to Import in Montro:
- Go to app.montro.io/login and sign in with your Montro credentials.
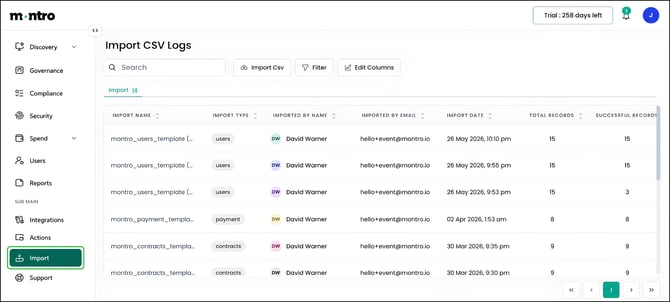
- In the left-hand navigation, under SUB MAIN, click on Import.
- The Import CSV Logs page opens, showing a log of all previous imports.
What You’ll See
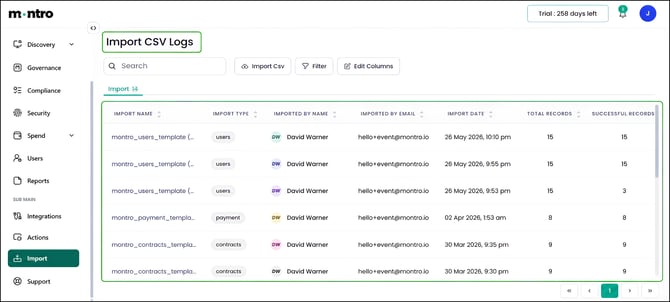
The page is headed Import CSV Logs. At the top you will find the Import Csv button to start a new import, alongside Search, Filter, and Edit Columns controls.
The Import tab shows a table of every import that has been run. Each row tells you:
- Import Name - the filename that was uploaded.
- Import Type - the type of data imported (e.g. users, payment, contracts).
- Imported By Name and Email - who ran the import.
- Import Date - when the import was run.
- Total Records - how many rows were in the uploaded file.
- Successful Records - how many rows were imported without errors.
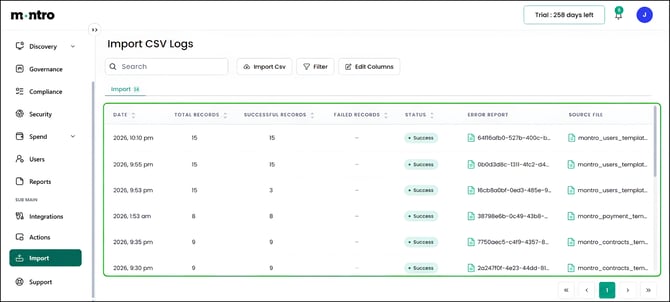
- Failed Records - how many rows could not be imported.
- Status - the overall result of the import (e.g. Success).
- Error Report - a reference to the error file if any rows failed.
- Source File - the original file that was uploaded.
How to Run an Import
To import data into Montro:
- Click Import Csv at the top of the Import CSV Logs page.
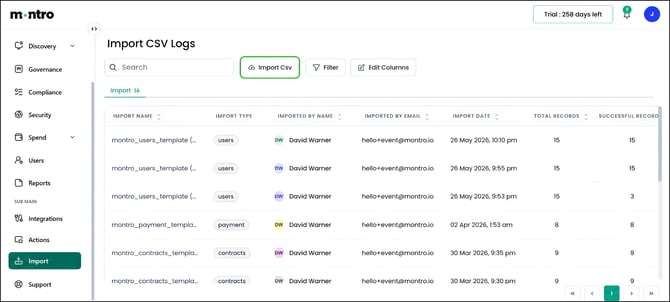
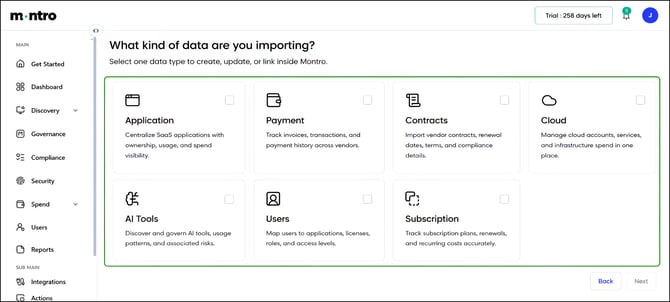
- A screen appears asking: “What kind of data are you importing?” Select the data type that matches what you want to upload.
Data Types You Can Import
Montro supports seven data types for import:
| Data type | What it imports |
| Application | SaaS applications with ownership, usage, and spend details |
| Payment | Invoices, transactions, and payment history across vendors |
| Contracts | Vendor contracts, renewal dates, terms, and compliance details |
| Cloud | Cloud accounts, services, and infrastructure spend |
| AI Tools | AI tools with usage patterns and associated risk details |
| Users | Users mapped to applications, licences, roles, and access levels |
| Subscription | Subscription plans, renewals, and recurring costs |
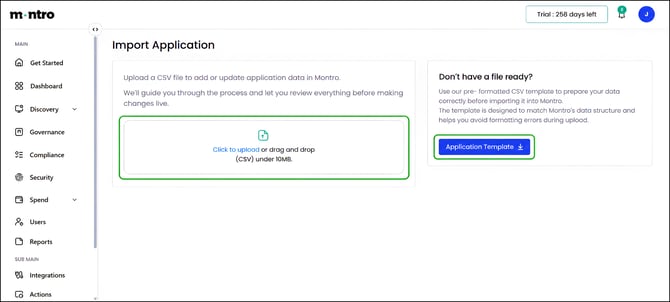
- Once you have selected a data type, click Next. You will land on the upload screen for that data type (e.g. Import Application).
- If you don’t have a file ready, click the template download button on the right-hand side of the upload screen (e.g. Application Template). This downloads Montro’s pre-formatted CSV template for that data type.
- Prepare your CSV file using the template. It is designed to match Montro’s data structure and helps you avoid formatting errors during upload.
- Upload your file by clicking Click to upload or dragging and dropping it into the upload area. CSV files only, under 10MB.
- Montro will guide you through a review step before any changes go live, so you can check everything looks correct before confirming.
- Once the import is processed, it will appear in the Import CSV Logs table with a status of Success or details of any rows that failed.
|
Tip - use Montro’s templates Each data type has a pre-formatted template available on the upload screen. Click the template download button (e.g. Application Template) on the right-hand side before uploading. It ensures your columns match what Montro expects and reduces the chance of failed records. File size limit is 10MB, CSV format only. |
Checking Your Import Results
After an import completes, return to the Import CSV Logs table to check the result:
- A Status of Success means all or most records were imported correctly.
- Check Successful Records vs Total Records - if the numbers differ, some rows failed.
- If there are Failed Records, open the Error Report file to see which rows were not imported and why.
- Correct the errors in your CSV and re-run the import for the failed rows only.
Import vs Integrations
Both Import and Integrations bring data into Montro, but they work differently and suit different needs:
| Import | |
| Best for | One-time uploads, bulk data entry, initial setup |
| How it works | You prepare a CSV file and upload it manually |
| Data stays current | Only as current as your last upload |
| When to use | Setting up Montro, migrating from another tool, bulk updates |
Most organisations use both - Integrations for ongoing discovery and Import for filling in historical data or records that aren’t available through an integration.
Best Practices
- Always use Montro’s template for the data type you are importing - it reduces errors significantly.
- Check Total Records vs Successful Records after every import to catch any failures immediately.
- Review the Error Report if any rows failed - it will tell you exactly what went wrong and which rows need correcting.
- Keep your source files - the Import CSV Logs table links back to them, making it easy to audit what was uploaded.
- Use Import for the initial setup of Montro, then let Integrations keep your data current going forward.
- Do not import the same records twice without checking - duplicates can affect your governance and spend data.