
|
Overview The Payments section brings together all financial activity related to your software and technology. It has six tabs: Payments, Send Automation Invoices, Cards, Transactions, Receipts, and Invoices. Each one gives you a different angle on your spend - from individual payment records linked to applications and contracts, through to uploaded receipts and vendor invoices awaiting approval. |
Accessing Payments
In the left-hand navigation, click Spend to expand it, then click Payments.
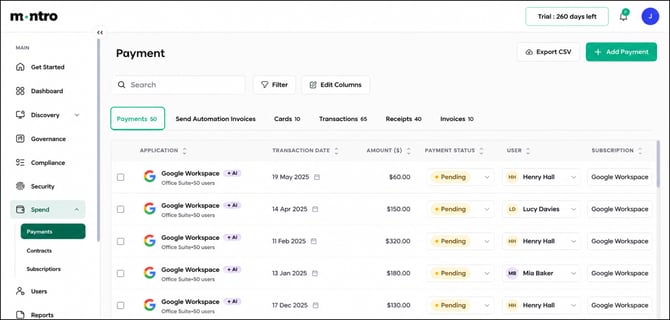
At the top right you will find Export CSV and + Add Payment. Use Export CSV whenever you need to pull data out for a budget review, audit, or finance report. Use + Add Payment to log a payment manually if it has not come in through an integration or forwarded invoice.
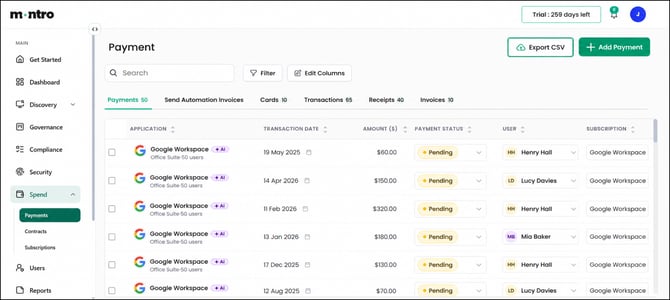
Three controls are available across all tabs:
Search - useful when you know the application or merchant name and want to get straight to it.
Filter - narrow the list by date range, payment status, or other criteria. Helpful when you are trying to find all Pending payments or everything linked to a specific application.
Edit Columns - if the table feels busy, hide the columns you do not need for your current task.
Payments Tab
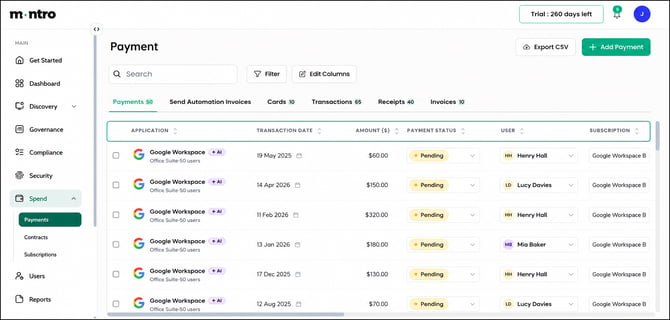
This is the main view of all payment records. Each row is one payment linked to an application. The tab is wide - scroll right to see all columns.
The columns you will see first:
Application - the tool the payment relates to. If you see a +AI badge, this application has AI capabilities. The category and user count sit underneath the name to give you quick context.
Transaction Date - when the payment was made or is due. Use this to spot payments that are overdue or coming up soon.
Amount ($) - the value of the payment.
Payment Status - most payments will show Pending, which means the record has been logged but the payment has not yet been confirmed as processed. If you have a lot of Pending records that should have cleared, it is worth checking whether your payment source integration is syncing correctly.
User - the person this payment is associated with. Useful for understanding who in the organisation is generating spend against a particular tool.
Subscription - the subscription this payment is linked to. Keeping this populated makes it easier to reconcile payments against your subscription records.
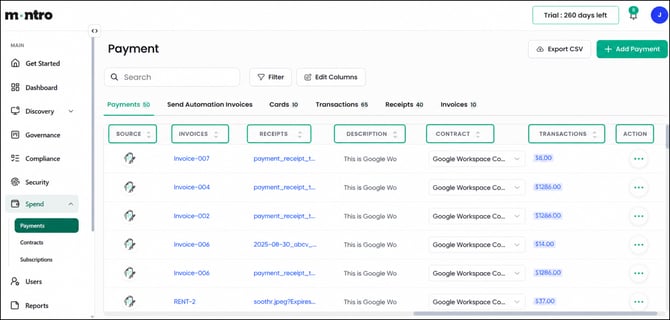
Scroll right to see:
Source - where this payment record came from, shown as an icon.
Invoices - the invoice linked to this payment. Click the link to open it.
Receipts - the receipt linked to this payment. Click the link to open it.
Description - a short note about the payment.
Contract - the contract this payment sits under. If this is blank, consider linking it, it helps keep your contract and payment data aligned.
Transactions - the transaction amount associated with this payment.
Action - the (…) menu lets you edit or delete the record.
Send Automation Invoices Tab
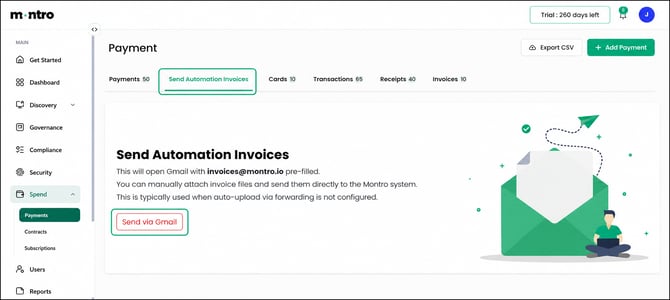
This tab does not show a list of records. Instead, it gives you a quick way to get invoices into Montro manually.
Click Send via Gmail and it opens Gmail with invoices@montro.io already filled in as the recipient. Attach the invoice file and send it. Montro picks it up from there and adds it to your records automatically. This is most useful when you have received an invoice by email and want to get it into the system quickly, without waiting for an automated forwarding rule to be in place.
Cards Tab
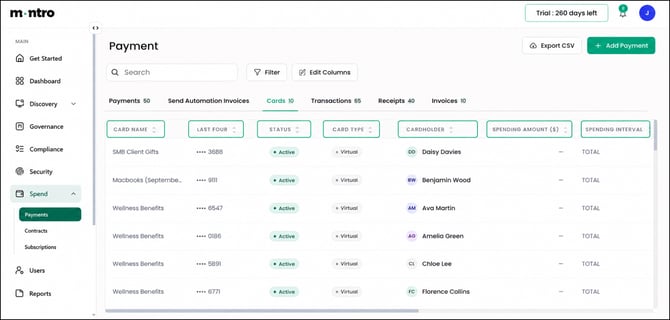
The Cards tab shows all virtual and corporate cards connected to your account. Each row is one card. If your organisation uses virtual cards for specific purposes; team expenses, client gifts, recurring SaaS subscriptions - this is where you track them.
Card Name - the label given to the card, for example SMB Client Gifts or Wellness Benefits. A clear name makes it easy to see at a glance what the card is used for.
Last Four - the last four digits of the card number, for identification.
Status - Active means the card is in use. If a card should no longer be active, this is where you would spot it.
Card Type - the type of card. Virtual is the most common.
Cardholder - the person the card is assigned to.
Spending Amount ($) - the total spend recorded against this card.
Spending Interval - the period the spending amount covers.
Transactions Tab
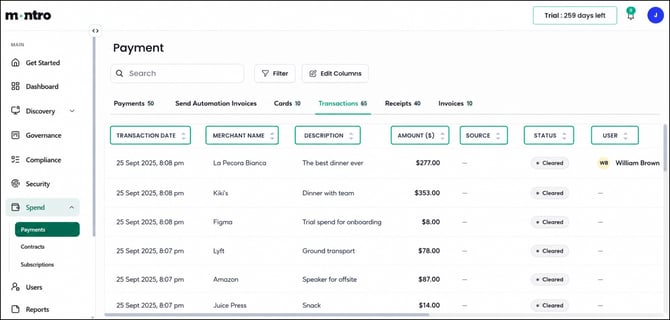
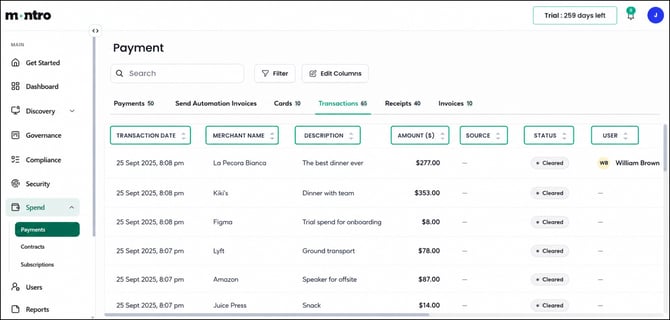
The Transactions tab is a complete log of individual transactions from your connected payment sources. Where the Payments tab shows payments linked to applications and subscriptions, Transactions shows the raw activity - every merchant charge, regardless of whether it has been matched to a Montro record yet.
Transaction Date - the date and time of the transaction. Transactions are listed most recent first.
Merchant Name - who the money went to. This is where you will see everyday spend like travel, meals, or software purchases alongside the SaaS tools you already track.
Description - a short note about what the transaction was for, for example Dinner with team or Speaker for offsite. These often come through from the card transaction data.
Amount ($) - the value of the transaction.
Source - the payment source this transaction came from.
Status - Cleared means the transaction has been fully processed. If you see transactions that have not cleared, check the payment source for any issues.
User - the person associated with the transaction, where this has been matched.
| Tip - use the Transactions tab to catch ungoverned spend. If you see merchant names in this list that you do not recognise as sanctioned tools, those are worth investigating. An employee expense on a new AI tool that has not been through any procurement or governance review is exactly the kind of shadow spend Montro is designed to surface. |
Receipts Tab
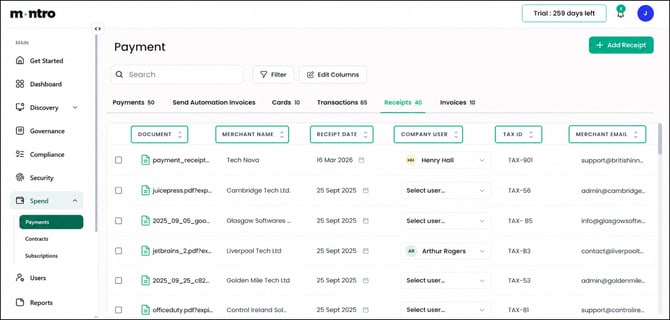
The Receipts tab stores all receipt documents that have been uploaded or forwarded into Montro. Use + Add Receipt at the top right to add one manually. Each row is one receipt.
Document - the filename of the receipt. Click it to open the document.
Merchant Name - who the receipt is from.
Receipt Date - when the purchase was made.
Company User - the person this receipt belongs to. If it shows Select user, it has not been assigned yet. Unassigned receipts are harder to reconcile at month end, so it is worth keeping this column clean.
Tax ID - the merchant’s tax identifier, useful for VAT or expense reporting.
Merchant Email - the contact email for the merchant.
Merchant Address - the merchant’s registered address.
Country - the country of the merchant, shown as an ISO country code and name.
Action - the (…) menu for editing or deleting the receipt record.
Invoices Tab
The Invoices tab is where vendor invoices live. Use + Add Invoice at the top right to add one manually. This is the place to track what has been billed, what has been approved, and what is still waiting on sign-off.
Invoice Number - the reference number from the vendor, for example Invoice-007.
Vendor - who the invoice is from.
Invoice Date - when the invoice was issued.
Due Date - when payment needs to be made. Due dates shown without an Approved status are the ones to act on first.
Amount ($) - the total value of the invoice.
Status - Approved means the invoice has been signed off and is ready for payment. Pending means it is still waiting for approval. Keep an eye on Pending invoices as they approach their due date.
Tax Amount - the tax portion of the invoice, where applicable.
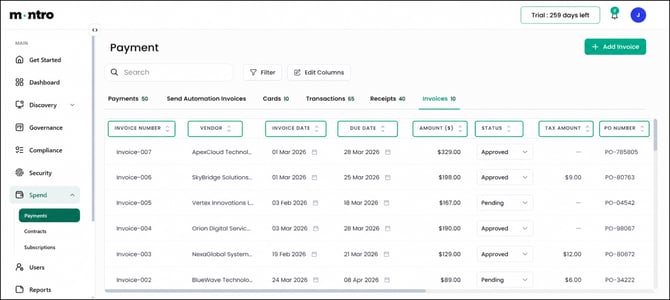
PO Number - the purchase order reference linked to this invoice.
Country - the vendor’s country.
Merchant Email - the vendor’s contact email.
Company User - the person in your organisation this invoice is assigned to.
Action - the (…) menu lets you Edit or Delete the invoice record.
| Tip - filter by Pending and sort by Due Date. This is the fastest way to see which invoices need approval before they go overdue. Deal with those first before moving on to anything else in this tab. |
Best Practices
- Link payments to subscriptions and contracts as you add them - a connected record is far more useful than an isolated payment entry when it comes to reporting or audit.
- Keep the Company User column in Receipts up to date - unassigned receipts make month-end reconciliation harder than it needs to be.
- Use the Transactions tab periodically to check for merchant spend that has not been matched to a known application. That is often where ungoverned or duplicate tool spend hides.
- Check Pending invoices against their Due Dates regularly so nothing slips through without approval.
- Use Export CSV from any tab to pull data for budget reviews, finance reports, or audit preparation.