
|
Overview The Users section gives administrators a centralised place to manage everyone who has access to Montro - internal employees, external users, and departments. It helps your organisation maintain accurate access records, support governance initiatives, and ensure accountability across the platform. |
Why User Management Matters
As your organisation grows, more people across different teams will need access to Montro. Without a structured approach to managing that access, things can quickly get out of hand - people retain permissions they no longer need, accountability becomes unclear, and compliance becomes harder to demonstrate.
Common problems that arise without proper user management:
| Problem | Impact |
| Users retain access after role changes | Security risk and governance gaps |
| No clear record of who has access | Difficult to audit or demonstrate compliance |
| Permissions assigned inconsistently | Uneven accountability across teams |
| No process for offboarding users | Former employees may retain active access |
Accessing Users
To get to the Users section in Montro:
- Go to app.montro.io/login and sign in with your Montro credentials.
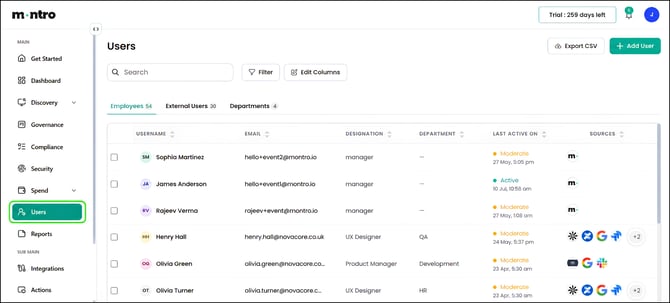
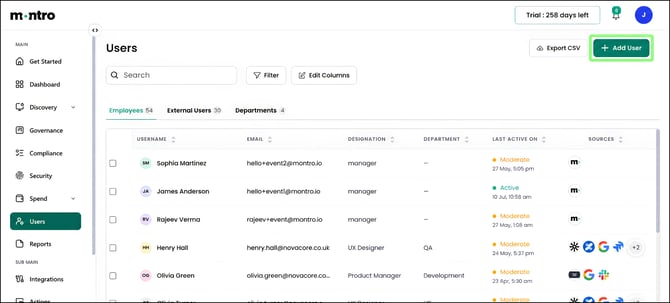
- In the left-hand navigation, click on Users. It sits directly below Spend.
- The Users page opens showing a table of all users in your organisation.
The Three Tabs
The Users page is organised into three tabs. The count next to each tab name shows how many records are in that view.
Employees
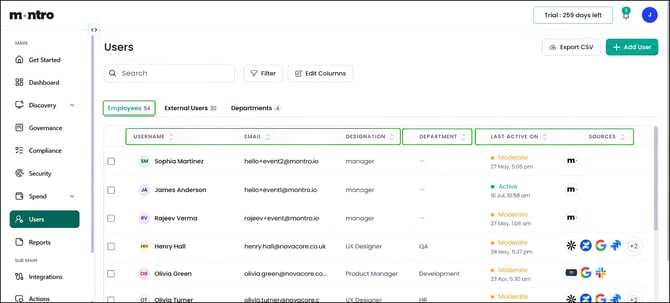
The Employees tab lists all internal users in your organisation. Each row represents one person and shows:
Username - the user’s display name with their avatar initials alongside. These initials appear across Montro wherever this person is associated with an asset, licence, or action.
Email - their login identity and primary contact address in Montro.
Designation - their job title or role within the organisation, for example UX Designer or Product Manager. Keeping this accurate helps trace asset ownership to the right person.
Department - the team or business unit they belong to, for example Development, QA, or Marketing. This links to the Departments tab and helps group users for reporting and governance.
Last Active On - when this person last used Montro, with a colour-coded activity indicator. Active (green) means they have been in the platform recently. Moderate (amber) means they are active but less frequently. Use this column to spot accounts that may no longer be in use.
Sources - the integrations through which this user was discovered or brought into Montro, shown as app logos. For example, a user discovered through Montro directly shows the Montro logo. A user connected via Google Workspace or Slack will show those logos. Multiple logos mean the user appears across several integrations.
External Users
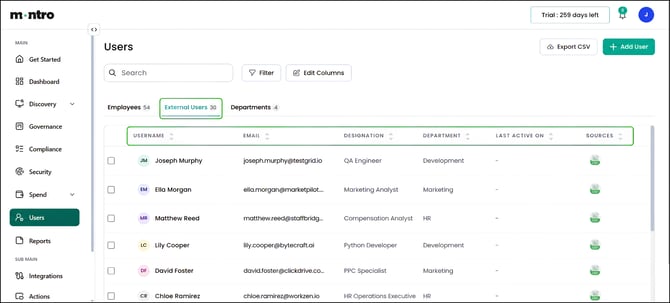
The External Users tab shows people who have access to Montro but are not part of your organisation - for example contractors, partners, or users imported from external sources. The columns are the same as the Employees tab: Username, Email, Designation, Department, Last Active On, and Sources.
One difference you will notice in this tab: the Sources column typically shows a CSV icon rather than integration logos. This means these users were added via a CSV import rather than discovered through a connected integration. Their Last Active On column may also show a dash where activity cannot be tracked.
| Tip - review External Users periodically. Contractors and partners often have time-limited engagements, but their Montro access does not automatically expire when a project ends. Use this tab to check that external users are still active and remove anyone whose access is no longer needed. |
Departments
The Departments tab gives you an organisation-level view, grouped by team rather than individual. Each row represents one department and shows:
Department Name - the name of the department, for example Development, HR, Marketing, or QA.
Users - the members of this department, shown as avatar initials with an overflow count where there are more than four. For example, +25 means there are 25 additional users beyond the four shown.
Applications - the tools that users in this department are active on, shown as app logos with an overflow count. This gives you a quick view of which applications each team is using.
Action - the (…) menu for editing or deleting the department record.
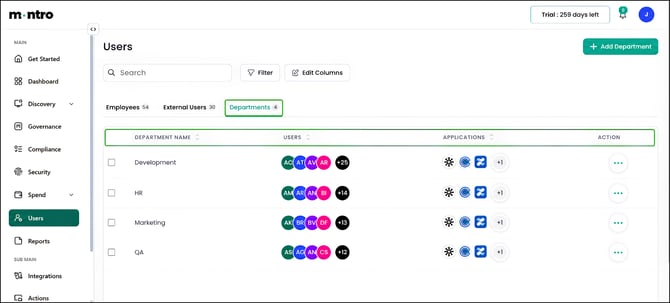
At the top right of the Departments tab, the button changes to + Add Department. Use this to create a new department and start assigning users to it.
| Tip - use the Departments tab to spot application sprawl by team. If the Applications column for a department shows a large overflow count, that team may be using more tools than expected. Cross-reference with the Discovery and Compliance modules to check whether those applications are sanctioned and governed. |
Adding a User
Click + Add User at the top right to create a new record.
A panel opens on the right-hand side with the following fields:
- Full Name - required.
- Email - required.
- Designation - optional.
- Department - optional.
- + Add Fields - use this to include additional information beyond the defaults.
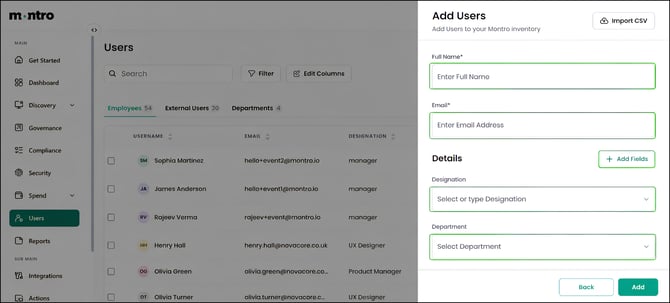
Click Add to save. The user appears in the list immediately.
|
Adding multiple users at once If you need to add several users in one go, use the Import CSV option at the top right of the Add Users panel. Prepare your user list in a CSV file and upload it to add everyone at once rather than one by one. |
How Users Supports Governance and Compliance
User records in Montro are not just an admin tool - they play a direct role in how governance and compliance work across the platform. Ownership of assets, accountability for reviews, and audit trails all depend on accurate user information.
| Governance need | How Users helps |
| Asset ownership | Users can be assigned as owners of applications, AI tools, and cloud services |
| Audit readiness | Access history and user records provide a traceable log of who had access and when |
| Accountability | Governance tasks and reviews are linked to specific named individuals |
| Compliance reporting | Accurate user data demonstrates controlled access to auditors and regulators |
Best Practices
- Review the user list regularly - use the Last Active On column to spot accounts that may no longer be in use.
- Remove or deactivate access promptly when someone leaves, do not wait for a scheduled review.
- Keep Designation and Department fields accurate so asset ownership can be traced to the right team.
- Use the Sources column to understand how users are being discovered, if someone appears unexpectedly, investigate.
- Use Export CSV periodically to maintain an offline record of who has access, for audit purposes.
- Assign asset ownership to named, active users, avoid leaving assets owned by someone who has left.